|
|
Section 3.10
Example Problem 3.2
Last Revised: 07/30/2011
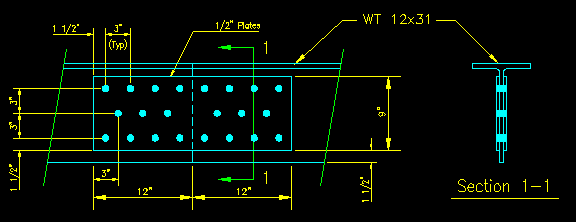
For this problem, we want to determine the tensile capacity of the pair of splice plates for the connection shown in Figure 3.10.2.1. We want to be able to compare the results from both LRFD and ASD, so the capacity will need to be in comparable equivalent service load terms for both methods.
Given: The tension splice connection shown in Figure 3.10.2.1 connects two WT sections with two splice plates attached to the web. Assume that the system supports a tension load that is 40% dead load and 60% live load.
|
Figure 3.10.2.1 |
|
|
Wanted: The capacity of the splice plates in terms of equivalent service load, Ps,eq, using both LRFD and ASD.
Solution: The chapter spreadsheet has a solution to the problem. You will need to review that solution as this discussion progresses.
First off, this problem is very similar to example problem 3.1. All the same limit states apply, so it is easy to copy over the prior spreadsheet and modify it as needed to meet the requirements of this problem. Since this problem is so similar, we skip the step by step explanation that was given for example problem 3.1. See the discussion from example problem 3.1 to understand the spreadsheet solution to this problem.
The differences between the two problems are:
- The applied loads are dead and wind load. This is different than was used in example problem 3.1, so different load combination equations are to be used.
- The splice plates in example problem 3.2 are connecting elements so there is an upper limit of 0.85Ag imposed on An.
- The hole pattern is different in that the "s" distance is shorter when computing An.
- There are two identical plates used in the same splice. Since all the limit states except slenderness are linear with respect to plate thickness you can either use 2*tpl for the plate thickness in all the strength based calculations or compute the capacity of one plate and multiply the result by two.
- We are not comparing the capacities against a known applied load. We are using the capacities to tell us how much force can be placed on the plates.
The solution is available in the spreadsheet file and can review the limit state calculations there. All the same principles for applying the limit states apply. Here, only some of the key concepts are presented.
Observations:
- A composite load factor is computed for the load combination equations. Doing this allows us to later compare the result of the LRFD and ASD solution by computing the comparable service level total load, Ps,eq. This is not normally done in practice since you are to use ONLY LRFD or ASD on a given project. It is done here for educational comparison purposes.
- As the results in Table 3.10.2.1 illustrate, the LRFD case continues to be the more liberal computational method because of the significant dead load component.
- We chose to compute the capacity of the a single plate then double the value to obtain the capacity of the two splice plates working together to transfer the force from one WT to another.
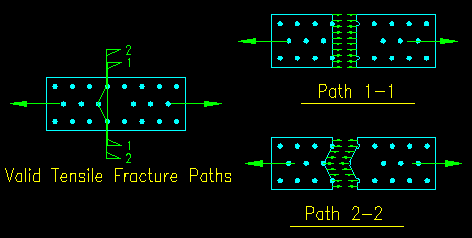
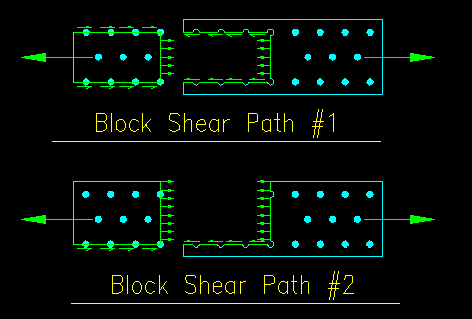
- Pay particular notice of the failure paths that were chosen for both tensile rupture and block shear. Figure 3.10.2.2 shows the failure paths for tensile rupture. The paths for block shear are shown in Figure 3.10.2.3. These paths are the only unique valid paths available in each case. The splice plate is a tension member with the bolts on each half pulling on it in opposite directions. This means that only 11 of the bolts pull in each direction. You should be able to explain why these are the only valid failure paths. Review the failure path tutorial if you have difficulties.
- The controlling limit state in this case is different than the one that controlled in example problem 3.1. If the same limit state controlled in every problem then there would be no need for the others! With experience, you may be able to predict the controlling limit state for a given case, however, in every structures problem ALL the applicable limit states must be evaluated to prove that the member works.
- In this problem, we "unfactored" the resulting capacity into its
service level dead and live load components. This is not a common
thing to do. Normally we already know what the loads are and are
trying to see if the member has sufficient capacity. Nevertheless,
there are times when we have a member already and we are trying to figure
out just how much load we can put on it. Hence the need for Ps,eq
and breaking the load down into its individual components. In the
more general case you may need to consider more than the one ASCE-7 load
combination equation for each design philosophy.
|
|
|
Figure 3.10.2.3 |
|
|
Table 3.10.2.1
Example Problem 3.2 Results
| Table of Capacities | ||||||
| LRFD | ASD | |||||
| Limit State | fPn | Pn/Weqiv | Pn/Weqiv | Pn/W | Pn/W | |
| (k/plate) | (k/plate) | (k/pair) | (k/plate) | (k/pair) | ||
| Slenderness | N/A | N/A | N/A | N/A | N/A | |
| Tensile Yielding | 202.5 | 140.6 | 281.3 | 134.7 | 269.5 | |
| Tensile Rupture | 167.3 | 116.2 | 232.4 | 111.6 | 223.1 | |
| Block Shear | 189.0 | 131.3 | 262.5 | 126.0 | 252.0 | |
| Bolt Bearing | 433.1 | 300.8 | 601.6 | 288.8 | 577.5 | |
| Controlling Capacity | 167.3 | 116.2 | 232.4 | 111.6 | 223.1 | |
| Dead Load | 93.0 | 89.3 | ||||
| Live Load | 139.5 | 133.9 | ||||
| Answer | Answer | |||||
One of the first things to note is that controlling limit state in this case is different than the one that controlled in example problem 3.1. If the same limit state controlled in every problem then there would be no need for the others! With experience, you may be able to predict the controlling limit state for a given case, however, in every structures problem ALL the applicable limit states must be evaluated to prove that the member works.
In this problem, we "unfactored" the resulting capacity into it's service level dead and live load components. This is not a common thing to do. Normally we already know what the loads are and are trying to see if the member has sufficient capacity. Nevertheless, there are times when we have a member already and we are trying to figure out just how much load we can put on it. Hence the need for Ps,eq and breaking the load down into it's individual components. In the more general case you may need to consider more than the one ASCE-7 load combination equation for each design philosophy.


