|
|
Section 3.10
Example Problem 3.1
Last Revised: 07/30/2011
The example problems presented in this section also have a spreadsheet solution. You will need this file to follow along with the presented solutions. You can click on the following link to get the file:
Chapter 3: Excel Spreadsheet Solutions
Given: A 3/4" x 10" plate that is 5 ft long and has standard holes for 3/4" bolts at each end for attachment to other structural members. Figure 3.10.1.1 shows a face view of the plate. The service level loads that the member will be subject to are 140 kips of dead load and 30 kips of live load.
|
Figure 3.10.1.1 |
|
|
Wanted: Determine the axial tension capacity of the member.
Solution: The problem solution is pursued in the following steps:
- Determine the demand on the member.
- Check size based on the slenderness limit state.
- Determine the capacity of the member based on the
- tensile yielding limit state
- tensile rupture limit state
- block shear limit state
- bolt bearing limit state.
- Summarize the results.
Determining the Demand (Required Strength) on the Member
A first step is to determine the demand on the member. Pu and Pa represent the design axial tension loads for the LRFD and ASD design philosophies, respectively. These values will be used for all the limit state calculations for this problem.
Recalling that there are multiple load combinations listed in ASCE 7 that must be satisfied, you can compute all of them and find out which are the controlling ones. It will soon become obvious that, if the only loads seen by a member are dead and live loads, that LRFD-LC2 and ASD-LC2 will be the controlling load cases. You should take some time to verify this. These two equations may NOT control your design if you have other types of loads on the element being designed.
Let us consider LRFD first. The controlling ASCE 7 load case for computing Pu is LRFD-LC2.
Pu = 1.2D + 1.6L = 1.2(140 k) + 1.6(30 k) = 216 kips
Let's check out ASD. The controlling ASCE 7 load case for computing Pa is ASD-LC2.
Pa = D + L = 140 k + 30 k = 170 kips
Our member is 5 feet long and the least value of r is computed as:

The correct computation of L/r is (5 ft)(12 in/ft) / (0.217 in). The result is the unitless number 277. If you forgot the unit conversion then you would have gotten 23.1 ft/in. This is not the right answer! The correct expression of the limit state in your calculations is:
277 < 300 ... The limit state is satisfied
You will also note that we have written the limit state in an alternate form in the spreadsheet solution. We will be doing this throughout the text as the second form gives the percentage of capacity used. This is useful to know when considering alternate selections for a given member. In the example already stated, the numerical value of the limit state becomes:
0.924 < 1.00 ... the limit state is satisfied
This form is useful because you know on observation that you are nearing capacity and will need to make the plate thicker it gets much longer.
Another format issue: In your calculations, you should always explicitly state whether or not the limit state is satisfied so that someone reviewing your calculations doesn't have to guess.
Our next task is to determine if the member satisfies the limit state of tensile yielding. Consider both LRFD and ASD requirements.
Let's tackle the nominal strength, Pn, first. We need to find Fy and Ag. Fy is found to be 36 ksi in Table 2-5 (SCM page 2-49) using the preferred material specification for this bar.
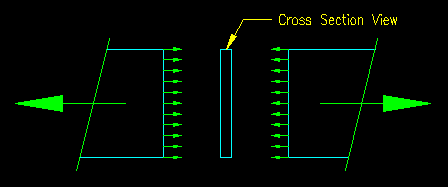
In Figure 3.10.1.2 you will notice a section line through the member that is labeled 1-1, tensile yielding failure path. The exact location of this path is not important. It is located anywhere between the end connections. Figure 3.10.1.3 shows a "failed" view with forces and stresses illustrated with arrows and the cross section. This location is where we determine the gross cross sectional area, Ag for the member. Using the requirements of this section and the given plate dimensions, Ag is computed to be 7.50 in2.
|
Figure 3.10.1.2 |
|
|
|
Figure 3.10.1.3 |
|
|
Using the values determined for Fy and Ag we can now compute the nominal tensile strength of the member, Pn:
Pn = (36 ksi)(7.500 in2) = 270 kips
Computing the Limit State:
Now that we have Pu, Ps, Pn, ft, and Wt we can compute the limit states.
| LRFD | ASD |
| Pu = 216 k < ftPn = 0.90(270 k) = 243 k | Pa = 170 k < Rn/Wt = 270/1.67 = 162 k |
| Pu / (ftRn) = 0.889 < 1.00 ... Okay | Pa / (Rn/Wt) = 1.051 NOT < 1.00 ... NO GOOD |
In this case, there is sufficient tensile yielding capacity to support the anticipated loads for LRFD but not for ASD.
Observations:
- Note that we are using 88.9% of the LRFD capacity of the section so, barring other controlling limit states, we have a healthy amount of reserve capacity in this case when using LRFD.
- For ASD, the limit state of tensile yielding is not satisfied and another member should be chosen to take its place. However, you see that our selection is fairly close to being sufficient, it is only 5% over capacity.
- Note that if only one limit state is violated then the member is not adequate and another must be chosen. So, if ASD is the prevalent desig philosophy for the problem, we know (even without checking any other limit states) that we will need to select another member for this application.
- Lest we get too confused here, you do not normally check both LRFD and ASD. You need to select one design philosophy or the other before you start your project and stick with it. You cannot be switching between LRFD and ASD in the same project! We will compute both most of the time in this text so that you become conversant in both methods.
- There is another side lesson that can be learned from this example. The reason that this member satisfies the limit state in LRFD and not in ASD is that the load is predominately dead load. Try reversing the load assignments and see what happens. In other words, make the live load 140 kips and the dead load 30 kips. You will find that the ASD calculation does not change at all, however the LRFD calculation now shows that the force exceeds the capacity by 7%. (Try it!) The exercise illustrates the variable nature of the LRFD effective factor of safety. In the first case the load is predominately dead load, which is has a higher probability of being accurately predicted. As a result a lower factor of safety is justified. When you reverse the loads, the load becomes predominately live load which has a lower probability of being accurately predicted hence a larger factor of safety is justified. The ASD method does not account for the probabilities associated with load estimation, hence ASD does not change.
The next limit state that we will determine is tensile rupture. This occurs at the end connections of the member.
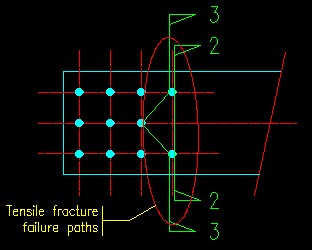
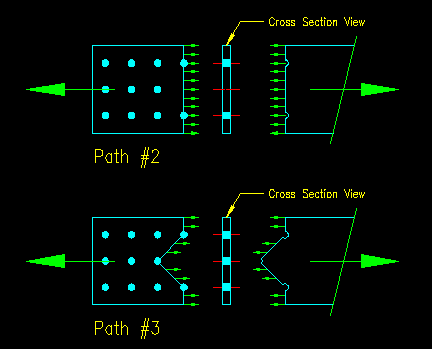
For our example problem, we can reduce our computational effort by recognizing that each end has the same rupture capacities since the arrangements of the holes (which reduce the effective section) are mirrored on each end. Consequently we only need to consider one end. Figure 3.10.1.4 shows the only two valid failure paths for the given end condition. Figure 3.10.1.5 shows the "fractured" connection and cross sectional views. Note that no other failure path is valid since no other conceivable path will see the full force of the member. Another way to look at this is that these are the only paths for which all the bolts will remain with only one of the fractured pieces. As this concept is often difficult to grasp, take some time to work the failure path tutorial if you haven't done so already.
| Figure 3.10.1.4 Tensile Rupture Failure Paths |
Figure 3.10.1.5 Tensile Rupture Failure Sections |
|
 |
|
In the general case, it is possible to have different hole patterns on each end, necessitating the computation of the tensile rupture limit state on each end.
First let's compute the net area An for each of the two failure paths identified in Figure 3.10.1.4.
| Path #2 | Path #3 |
| An2 = Ag - hole area + gage area = Ag - (num holes) *(db+1/16"+1/16")(tpl) = 7.50 in2 - (2 holes) *(0.75 in +1/8")(0.75 in) An2 = 6.19 in2
|
An3 = Ag - hole area + gage area = Ag - (num holes)(db+1/16"+1/16")(tpl) + (tpl)(s2/4g)1 + (tpl)(s2/4g)2 = 7.50 in2 - (3 holes)(0.75 in +1/8")(0.75 in) + (0.75 in)(3 in)2/(4*(3 in)) + (0.75 in)(3 in)2/(4*(3 in)) An3 = 6.66 in2 |
The controlling net area is An2 as it has the smaller value. This means that, if tensile rupture were to actually occur, this is the path that it would take. Therefore, for this problem
An = 6.19 in2.
In this problem we have only one cross sectional element (i.e. one plate element in the cross section) and it is attached to the bolts, so our problem falls under the requirements of case 1 in SCM Table D3.1 leading us to U = 1.0. This means that there is no shear lag for this problem. (Note that example 3.2 illustrates the concept of effective net area better than this problem does.) Consequently, for this problem SCM equation D3-1 becomes:
Ae = UAn = (1)(6.19 in2) = 6.19 in2
Fu is found to be 58 ksi in SCM Table 2-5 (SCM page 2-49) using the preferred material specification for this bar.
Using the values determined for Fu and Ae we can now compute the nominal tensile strength of the member, Pn:
Pn = (58 ksi)(6.19 in2) = 359 kips
Computing the Limit State:
Now that we have Pu, Ps, Pn, ft, and Wt we can compute the limit states.
| LRFD | ASD |
| Pu = 216 k < ftPn = 0.75(359 k) = 269 k | Pa = 170 k < Rn/Wt = 359/2.00 = 179 k |
| Pu / (ftRn) = 0.803 < 1.00 ... Okay | Pa / (Rn/Wt) = 0.947 < 1.00 ... Okay |
In this case, there is sufficient tensile yielding capacity to support the anticipated loads for both LRFD and ASD.
Observations:
- In this limit state, our bar member is adequate in both LRFD and ASD. You will notice that in this case the LRFD solution leaves more reserve capacity than the ASD solution. This is because our loads are predominately dead load, and hence more predictable as discussed above. The lower effective factor of safety is justified.
- You will notice that the approach taken in the spreadsheet solution for computing An for this problem is slightly different than used above. You will often find that there is more than one way to write an equation to get the same results. In the spreadsheet, we recognize that each line segment of the failure path potentially has pitch, s, and gage, g. In the case of a line segment that is perpendicular to the path, s = 0 and hence the s2/4g term for that part of the path is zero. Also, in the spreadsheet solution, holes are recognized as having negative width. The result is the same as the calculation above, but is not very compact. Also, the spreadsheet form is not as friendly on any member other than a flat plate. The spreadsheet is used here to demonstrate that there is more than one way to compute the same answer. You will probably develop your own methods consistent with the intent of the specification.
Block Shear Rupture Limit State:
Computing the Nominal Block Shear Rupture Strength, Pn:
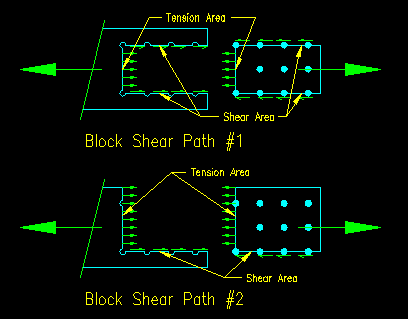
There are actually three potential block shear failure paths for our problem. Two are shown in Figure 3.10.1.6. The third potential failure path is similar to block shear failure path #2 except that it tears out the "bottom" instead of the "top" of the member. As the areas associated with these two paths are identical their capacities will be identical, so only one of the two paths need be considered.
|
Figure 3.10.1.6 |
 |
Block shear rupture on failure path #1:
In this case, the failure path runs from the end of the member from center of bolt hole to center of bolt hole around the perimeter of the bolt hole group. There are two shear area and one tension area. It is likely that the tension stress distribution is uniform so Ubs is taken as 1.0. Let's start by computing the quantities needed for equation J4-5:
Agv = (2 paths)(10.5 in)(0.75 in)
Agv = 15.75 in2Anv = Agv - holes = 15.75 in2 - (2 paths)(3.5 holes/path)(0.75" + 0.125")(0.75")
Anv = 11.16 in2Ant = (1 path)[6.0 in - (2 half holes = 1 hole)(0.75" + 0.125")](0.75 in)
Ant = 3.84 in2
Using these quantities along with the previously given quantities, equation J4-5 becomes:
Rn = 611.2 k not to exceed 563.1 k = minimum(611.2 k, 563.1 k)
Rn = 563.1 k
This is one shear rupture value. We now need to look at failure path #2.
Block shear rupture on failure path #2:
In this case, the failure path runs from the end of the member from center of bolt hole to center of bolt hole and out through one side of the element. There is one shear area and one tension area, causing a stress imbalance on the tension surface. It is likely that the tension stress distribution is not uniform so Ubs is taken as 0.50. Let's compute the quantities needed for equation J4-5:
Agv = (1 path)(10.5 in)(0.75 in)
Agv = 7.875 in2Anv = Agv - holes
Anv = 7.875 in2 - (1 path)(3.5 holes/path)(0.75" + 0.125")(0.75")
Anv = 5.58 in2Ant = (1 path)[8.0 in - (1.5 holes)(0.75" + 0.125")](0.75 in)
Ant = 5.02 in2
Using these quantities along with the previously given quantities, equation J4-5 becomes:
Rn = 339.6 k not to exceed 315.6 k = minimum(339.6 k, 315.6 k)
Rn = 315.6 k
Since failure path #2 yields the lower value for Rn, this is the controlling failure path for this limit state.
Computing the Limit State:
Now that we have Rn, ft, and Wt we can compute the limit states.
| LRFD | ASD |
| Pu = 216 k < ftRn = 0.75(316 k) = 237 k | Pa = 170 k < Rn/Wt = 316/2.00 =158 k |
| Pu / (ftRn) = 0.913 < 1.00 ... Okay | Pa / (Rn/Wt) = 1.077 NOT < 1.00 ... No Good |
In this case, there is sufficient block shear rupture capacity to support the anticipated loads for LRFD but not for ASD.
Observations:
- An experienced engineer could have discounted failure path #1 immediately because the extra tension area gained in path #2 is substantially less than the shear area lost over failure path #1. The breakeven point would be if the tension area gained equals the shear area lost divided by 0.60. Check out the equation, and you will see it.
- The question usually comes up about the "half" holes. Note that the failure path passes from center of hole to center of hole or to edge of member. Pretty much every time the path quits in the middle of a hole, only that half of the hole's width that is actually on the path is counted.
- Just as we found for tension rupture, the only failure paths that are valid are those that separate the main part of the member from ALL of the bolts.
- As a designer, you can often times cause this limit state to not be the controlling limit state simply by providing wider spacing for your bolts. Increasing the spacing increases the areas and, consequently, increase Rn. In a related observation, block shear is likely to be the controlling limit state when you have a large number of bolts with a fairly tight spacing on relatively thin material.
- The identification of failure paths is key to getting the right solution. The principle is pretty simple as is the example provided. If the critical path is not found, then there is a possibility of unexpected failure in your member.
Computing the Nominal Bolt Bearing Strength, Rn:
In this problem, we will assume that deformation at the bolt holes is not a design consideration. Since standard holes have been specified, this leads us to using Equation J3-6b.
The value for Lc is:
Lc = 1.5" - (0.75" + .125")/2 = 1.0625 in
This leads to a tear out strength of:
Rn(tear out) = 1.5(1.0625")(0.75")(58 ksi) = 69.3 k/bolt
The bearing deformation capacity is:
Rn(bearing deformation) = 3.0(0.75")(0.75")(58 ksi) = 97.9 k/bolt
From this we see that the tear out capacity controls the limit state. The capacity of the member, then, is the capacity/bolt times the number of bolts in the connection (11 bolts in this case). This results in:
Rn = 763 kips/member
Computing the Limit State:
Now that we have Rn, ft, and Wt we can compute the limit states.
| LRFD | ASD |
| Pu = 216 k < ftRn = 0.75(763 k) = 572 k | Pa = 170 k < Rn/Wt = 763/2.00 = 381 k |
| Pu / (ftRn) = 0.378 < 1.00 ... Okay | Pa / (Rn/Wt) = 0.446 < 1.00 ... Okay |
In this case, there is sufficient bolt bearing capacity to support the anticipated loads for both LRFD and ASD.
Summary
The following table is a summary of the considered limit states for this problem.
Example Problem 3.1 Resulting Limit State Ratios
| Limit State | LRFD | ASD |
| Slenderness | 0.924 | 0.924 |
| Tensile Yielding | 0.889 | 1.051 |
| Tensile Rupture | 0.803 | 0.947 |
| Block Shear | 0.913 | 1.077 |
| Bolt Bearing | 0.378 | 0.446 |
The ratios in the table represent the applied force divided by the capacity of the member. Values less than or equal to 1.00 indicate that there is sufficient capacity for the indicated limit state. Values over 1.00 indicate that there is not enough capacity to support the predicted loads.
For this problem, the member works for the given loads when using LRFD. It does not work for ASD.
The critical strength based limit state (slenderness is not a strength based limit state) is block shear for both LRFD and ASD. Reviewing the calculations, the capacities associated with the limit state of block shear are:
| Pu < ftRn = 237 k | Pa < Rn/Wt = 158 k |
To express the results in terms of comparable equivalent service loads, we must "unfactor" each result. Let's assume that the applied load, Ps,eq, consists of half dead load and half live load.
The controlling ASD load case is ASD-LC2:
Pa = D + L = (.5Ps,eq) + (.5Ps,eq) = 1.0 Ps,eq < 158 k
ASD Ps,eq < 158 k
The controlling LRFD load case is LRFD-LC2:
Pu = 1.2D + 1.6L = 1.2(.5Ps,eq) + 1.6(.5Ps,eq) = 1.4 Ps,eq < 237 k
LRFD Ps,eq < 237 k / 1.4 = 169 k
In conclusion, using LRFD in this case will result in allow a greater actual load (169 k vs. 158 k) to be applied to the member than will ASD. You should be able to answer the question: Why is this so?
Finally, in the spread sheet solution, there is a comparison of capacity for different percentages of dead load in the total load. This is not a requested part of the problem. It is placed here for you to get a feel for variable nature of the LRFD factor of safety. Notice that LRFD has a much greater capacity as the load becomes more predictable (i.e. the load becomes predominately dead load).


