|
|
Section 5.2
Finding Forces on Welds
Last Revised: 11/04/2014
Now that you know a little about welds and what they do, lets look at ways in which we can determine the force on a part of a weld in a connection. The methods and procedures commonly used for finding forces resulting from applied forces are presented below. Note that these methods and procedures result from principles of structural mechanics and structural analysis and are NOT found in the specification. As far as the specification is concerned, it is the engineer's responsibility to find the forces in welds by any defendable method.
It is common to express the results of weld force calculations in terms of the force per unit length of weld. In connections where there is eccentricity, the stress varies throughout the weld group. The force per unit length is found by multiplying the stress (force per unit area) at a given location by the effective throat (or weld thickness), te, at that location.
Connections with Concentric Forces
|
Figure 5.2.1 |
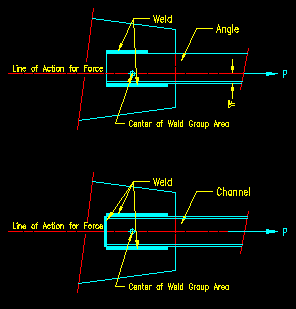 |
Figure 5.2.1 illustrates two connections where the applied force, P, is concentric with the fillet weld group.
In each case, the stress at any location equals the concentric force, P, divided by the area of the welds (sum of tel for all weld segments).
Note that, for fillet welds, we do not differentiate between tensile and shear force. In a fillet weld all stresses are assumed to be shear as they will have a significant shearing component on the critical face of the weld.
An important assumption when determining the shear in welds WHERE THE APPLIED CONNECTION FORCE IS CONCENTRIC WITH THE BOLT GROUP is that all shear planes in a connection see the same applied shear STRESS, fv. This is an appropriate assumption because all welds are constrained by the connected members to deform the same. If they all have the same shear deformations, then they all have the same shear strains and hence they all have the same shear stress.
The shear stress, fv, on the critical shear planes equals the total force being transferred divided by sum of all the shear plane areas:
fv = P / S(Shear Plane Areas) = P / S(te * lengths)
The UNIT SHEAR FORCE = fv te
In Plane Eccentrically Loaded Connections
As with bolts, there is an elastic method based on basic principles of superposition and there is an ultimate strength method that looks at the simultaneous translation and rotation of the connection. Both are found in the welding section of the SCM (part 8, pages 8-9 to 8-14). Figure 5.2.2 depicts a typical case of an eccentrically loaded weld group, with the load in the plane of the faying surface.
Figure 5.2.2
Eccentricity in the Plane of the Faying Surface
Click on image for larger view

The Elastic Method
The Elastic method is described in the SCM starting on page 8-12. Using the principle of superposition, the applied forces are converted to a concentric (i.e. passes through the center of the weld group) translational force and a rotational moment.
The stress due to the translational force is equal to the applied force divided by total length of the weld and effective throat, te. See SCM page 8-12 for the equations. The direction of the reactionary stress is opposite that of the applied force. It is common practice to break the force into orthogonal components (i.e. in the "x" and "y" directions, as shown in Figure 5.2.3) and combine the stresses vectorally with the stress resulting from the moment.
Figure 5.2.3
Translational Forces and Reaction Stresses
Click on image for larger view
Note that the orientation of the weld with relation to the direction of the applied force is not of concern. All the stresses are assumed to be shear stresses.
The stress due to the applied moment is determined using the torsion formula learned in Mechanics. The equation can be found on SCM page 8-12. Figure 5.2.4 shows the applied force and the reactionary stresses. Note that the stress at any location is perpendicular to a line from that same location that passes through the center of gravity of the bolt group.
Figure 5.2.4
Rotational Force and Reaction Stresses
Click on image for larger view
Computing the stress due to the applied moments requires that the polar moment of inertia be computed for the weld group. SCM page 8-13 gives some equations for Ix and Iy for some common weld shapes. Using the parallel axis theorem, these equations can be combined to find Ix and Iy for the group relative to the weld group centroid. With this information Ip can be computed since Ip = Ix + Iy.
From the given equations the stresses at any point in the weld group can be determined by vectorally adding the translational and rotational components for the stresses at the point of interest. SCM page 8-14 provides general equations for determining the two orthogonal components of the rotational reaction and how to vectorally add the components together.
As stated above, the goal is to find the largest stress, fv, in the weld group.
The maximum stress can then be expressed as a unit shear force:
The UNIT SHEAR FORCE = fv te
The Instantaneous Center of Rotation (i.e. Ultimate Strength) Method
|
Figure 5.2.5 |
As with bolts, the Elastic Method is conservative and inconsistent with test results. The IC method is more consistent with test results because it takes into account the simultaneous translation and rotation, without superposition, of the loaded connection. The method is presented in the SCM starting on page 8-10.
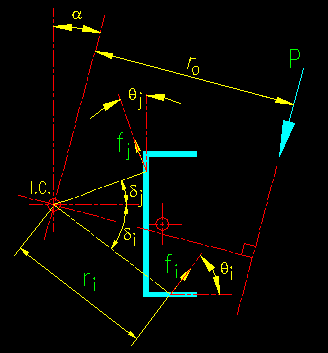
The IC method for weld groups follows the same principles used for the IC method for bolt groups. The main difference between the two methods is that welds tend to be continuous and there is a different load-deformation relationship. Figure 5.2.5 gives the basic geometric quantities that will be used in the following description of the method.
The IC method for welds begins with dividing the weld into discrete elements. These discrete elements are treated similar to the bolts previously described in chapter 5. As with all discrete approximations, increasing the number of elements increases the accuracy of the results. Twenty elements seem to give good results for most connections.
The load-deformation relationship for welds is given on SCM page 8-11. This relationship approximates the load-deformation test data presented on the same page. As can be seen from SCM Figure 8-5, the load-deformation relationship changes with the angle between the axis of the weld and the direction of the reaction force in a manner that is consistent with the discussion in Section 5.4 of this text. The computation of the angle of load to weld axis complicates the computation somewhat, as this angle must be determined for each element of weld.
The load-deformation equation given on SCM page 8-11 results in a quantity that is in terms of stress. To obtain the load per unit length of weld the result of the equation must be multiplied by the weld effective throat, te.
It appears that the SCM presentation on the IC method in SCM part 8 needs to be combined with the information regarding strength of fillet welds in SCM specification J2.4(b). There is change of notation between SCM pg 8-11 and SCM J2.4(b) that causes some confusion.
Based on SCM J2.4(b) the method for computing the force in each of your weld elements goes something like this:
- You will need to know the configuration of your weld group and its
geometric relationship to the line of action of the applied force.
- You need to choose a location for the I.C.
- You will need to compute component distances (i.e. parallel to the
reference coordinate system axis) to the center of each of your weld
elements from the IC. This allows you to compute distance of the
element from the I.C. (ri) and the angle relative to the
reference coordinate system (di) and
the angle between the weld axis and the resultant force on the weld element
(qi). Keep in mind that the
force on weld element is perpendicular to the radius line from the element
to the I.C.
- At this point you can compute the deformation of each element at
ultimate stress, Dui.
Dui = min[1.087(q + 6)-0.65 a, 0.17a]
- The critical element will be the one with the lowest Dui/ri ratio. This is normally the element furthest from the I.C. but not always. The "r" of this critical element becomes rcrit. The critical ratio can be expressed as:
(Du/r)critical = min (Dui/ri)
- As the deformations are assumed to be proportional to the
element distance from the I.C. we can find the deflections in each of the
elements when the critical element is at ultimate stress by:
Di = ri * (Du/ r)critical
- You then need to determine the deformation in each element at its maximum stress. To do this we find the deformation using the equation:
Dmi = 0.209(q + 2)-0.32 a
- We can now compute the ratio of the ith element's deformation to its own deformation at maximum stress:
pi = Di / Dmi
- Finally, you now have all the pieces to compute the magnitude of the stress on an element using SCM equations J2-7 and J2-8. These are combined together on SCM pg 8-11 and incorrectly stated to be a force equation. Multiplying the stress by the effective throat results in a force per unit length for the weld element. Multiplying by the length of the element results in the force on the element.
Ri = 0.6FEXX(1.0 + 0.5 sin1.5qi)[pi (1.9 - 0.9pi)]0.3 tei Li
- Recalling that these element forces are perpendicular to their radial from the IC, the forces can then be broken into their horizontal and vertical components for use in the equilibrium equations:
Rix = Ri sin di
Riy = Ri cos di
SFx = 0 =
SRix - Pnx =
S(Ri (riy / ri)) - Pn
sina
Pn = S(Ri (riy
/ ri) )/ sina
SFy = 0 =
SRiy - Pny =
S(Ri (rix / ri)) - Pn
cosa
Pn = S(Ri (rix
/ ri)) / cosa
SM = 0 = S(Ri
* ri) - Pn ro
Pn = S(Ri * ri)
/ ro
Since all the radial distances and angles are functions of the location of the IC, coordinate values of the IC are iteratively selected until equilibrium is satisfied (i.e. when all the equilibrium equations yield the same Pn). This procedure is well suited to a spreadsheet using an optimization routine such as the “solver” found in MS Excel.
The resulting Pn is the nominal capacity of the weld group.
Eccentricity Normal to the Plane of the Faying Surface
The SCM presents an elastic method for determining the stresses in welds when the eccentricity is normal to the plane of the faying surface (see SCM page 8-14). The SCM discussion is pretty sparse but adequate. The basic approach is an elastic vector approach where the force is moved to be concentric with the weld group and a moment added account for the bending resulting from eccentricity. Figure 5.2.6 illustrates the condition.
Figure 5.2.6
Eccentric Load Out-of-Plane of Faying Surface
Click on image for larger view
The basis of the method is founded in principles of elastic mechanics.
The force is moved so that it passes through the center of the weld group at the faying surface and the corresponding moment (Pe) is applied about the neutral axis of the weld group.
The forces are considered to be resisted by the weld group without taking into consideration any contribution from the compression between the connected parts.
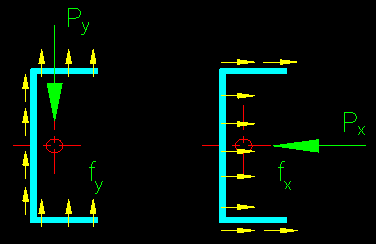
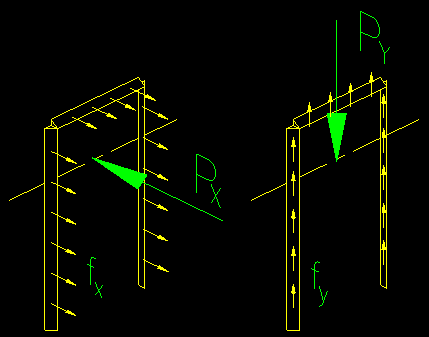
The stresses are computed using basic principles of mechanics. The translational stresses are shown in Figure 5.2.7.
Figure 5.2.7
Translational Forces and Reaction Stresses
Click on image for larger view
The stresses are computed using the equations:
fx = Px / Aw
fy = Py / Aw
Where:
- Px = the component of P normal to the faying surface
- Py = the component of P parallel to the faying surface
- fx = normal stress in the lateral direction
- fy = normal stress in the vertical direction
- Aw = effective area of the weld group (SteLw)
- te = The effective throat of the weld
- Lw = length of weld segment of effective throat te
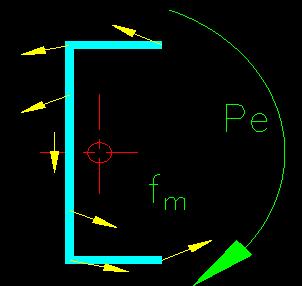
The stress due to the rotational force are depicted in Figure 5.2.8.
Figure 5.2.8
Rotational Force and Reaction Stresses
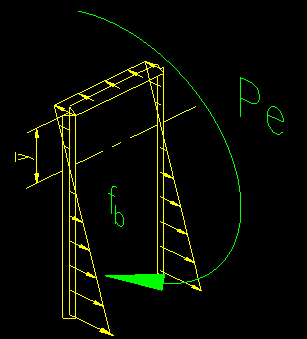
The stresses are computed using the bending stress equation:
fb = Pe c/Iw
Where:
- Pe = the applied moment
- c = maximum distance from the neutral axis. For this problem we are only interested in the tension stress so it is the distance from the neutral axis to the furthest weld in tension.
- Iw = the moment of inertia of the weld group about the centroidal axis.
The resultant maximum stress is the vector sum of the three stress components.
![]()
Multiplying fmax by te gives the maximum unit force applied to the weld group. The resulting unit force is then compared to the capacity (frn or rn/W, depending on whether P was Pu or Pa).
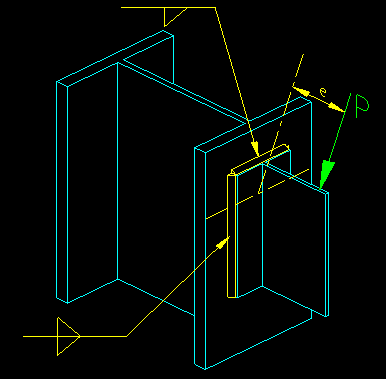
An example of a connection with an out-of-plane eccentricity is shown in Figure 5.2.9.
Figure 5.2.9
Seat Connection
Click on image for larger view
